 By
By 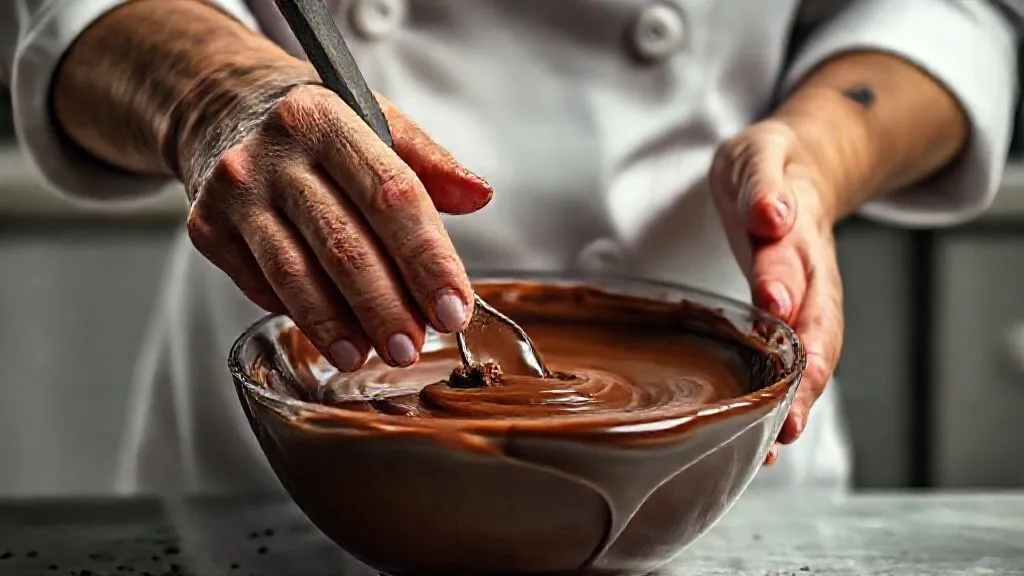
What's the best method to rescue seized tempered chocolate batches?
For over 20 years in the demanding world of professional pastry, I've witnessed countless moments of triumph and, inevitably, a fair share of culinary catastrophes. Few things evoke that particular sinking feeling quite like a batch of perfectly tempered chocolate suddenly seizing – transforming from a silky, molten dream into a grainy, unworkable mess. It's a common pitfall, even for seasoned chocolatiers, and it can feel like a devastating loss of precious time and ingredients.
This isn't just about a minor inconvenience; it's about the integrity of your entire dessert, the quality of your finish, and often, the significant cost of high-grade couverture. I understand that frustration deeply. That moment when you see those sugar crystals clumping, the fat separating, and your beautiful chocolate becoming a lumpy, unappealing mass – it can make you want to throw in the towel.
But here's the good news, born from years of trial, error, and meticulous refinement: seized chocolate is often not a lost cause. In this definitive guide, I'll share the professional techniques I've honed to confidently rescue seized tempered chocolate batches, turning potential waste into perfectly usable product. We'll explore not just the 'how-to,' but the 'why,' empowering you with the knowledge to troubleshoot, prevent, and even innovate.
Understanding the Enemy: Why Chocolate Seizes in the First Place
Before we can rescue our chocolate, we must understand its fundamental enemy: water. Chocolate, at its core, is a delicate emulsion of cocoa solids, cocoa butter (fat), and sugar. These components are designed to flow smoothly when melted. Introduce even a tiny amount of water, and this delicate balance is shattered.
The Science of Seizing: Water is the Foe
When water comes into contact with melted chocolate, it doesn't just mix in. Instead, the water molecules are immediately attracted to the sugar particles, which are hydrophilic (water-loving). The sugar crystals rapidly absorb the water and begin to clump together, forming a thick, gritty paste. This sudden clumping prevents the cocoa butter from flowing freely, causing the entire mass to seize and become stiff, grainy, and unworkable. It's a physical transformation, not a chemical one, which is why rescue is often possible.
Common Triggers for Seizing
Knowing the culprits is your first line of defense. I've seen these mistakes countless times, and they almost always lead to the same result:
- A Single Drop of Water: This is the most infamous and common cause. Even a minuscule splash from a wet spoon, a nearby bowl, or a damp countertop can initiate seizing.
- Steam from a Double Boiler: If the water in your double boiler is boiling too vigorously, steam can escape and condense into your chocolate. Always ensure the water is barely simmering and the bowl fits snugly over the pot.
- Overheating: While less common for true seizing, extreme overheating can 'burn' the cocoa solids, creating a thick, pasty texture that is difficult to work with and can resemble seizing.
- Sudden Temperature Shock: Rapid cooling or heating can sometimes cause the chocolate to become lumpy, though this is more often related to improper tempering than true seizing.
- Improper Additions: Adding cold or water-based liquids (like alcohol or flavorings) directly to melted chocolate without proper emulsification can cause it to seize.
The Immediate Response: Assessing Your Seized Batch
The moment you suspect seizing, pause. Don't panic and don't discard it immediately. Your first step is to accurately assess the situation. Is it truly seized, or just overly thick?
Is it Seized or Just Thick?
There's a crucial distinction here. Seized chocolate will look grainy, lumpy, and often have a dull appearance. It feels stiff and resistant to stirring, almost like wet sand. The fat (cocoa butter) may appear to be separating. Over-thickened chocolate, on the other hand, will still be smooth and glossy, but extremely viscous and difficult to pour or spread. This is usually due to slight cooling or insufficient stirring, and often just requires gentle reheating and continued agitation.
The Point of No Return (and When It's Not)
In my experience, truly seized chocolate, characterized by that gritty, clumpy texture, is almost always salvageable for many applications. The 'point of no return' is rare, typically only when the chocolate has been severely burned or scorched, or if so much water has been incorporated that it resembles a sludge rather than a paste. For most instances of seizing, you have options. We're aiming to re-emulsify the chocolate, essentially forcing the sugar particles to release their grip on the water and allow the cocoa butter to flow freely again.

Method 1: The Hot Liquid Rescue (The Go-To for Most Cases)
This is the most common and often most effective method for rescuing seized chocolate, particularly if you're not planning to re-temper it for enrobing or molding. It works by introducing enough additional liquid to fully dissolve the sugar crystals that have clumped together, effectively creating a new, smooth emulsion.
When to Use This Method
I recommend the hot liquid rescue when your seized chocolate is destined for applications where a slightly softer set or a different fat content won't be detrimental. Think ganaches, sauces, fillings, brownies, or even hot chocolate. It's a fantastic way to salvage a batch without sacrificing flavor.
Step-by-Step Hot Liquid Rescue
- Assess and Isolate: Confirm your chocolate is seized. Transfer it to a clean, dry, heatproof bowl if it's not already in one.
- Prepare Your Liquid: Choose a liquid that complements your chocolate and intended use. Common choices include hot water, hot cream, or melted butter. Heat a small amount (start with 1-2 tablespoons for every 8-10 ounces of seized chocolate) until it's very hot, almost simmering.
- Add Gradually and Vigorously Stir: This is the critical step. Add about a teaspoon of the hot liquid to the seized chocolate. Immediately and vigorously stir with a rubber spatula or whisk. At first, it might look worse, clumping even more. Don't despair! Keep stirring with force, scraping the sides and bottom of the bowl.
- Observe and Repeat: As you stir, the chocolate should begin to loosen and smooth out. If it's still grainy, add another teaspoon of hot liquid and continue stirring vigorously. Repeat this process, adding small amounts of liquid and stirring intensely, until the chocolate is completely smooth and homogeneous again.
- Achieve Desired Consistency: Continue adding liquid until you reach your desired consistency. Remember, you are essentially making a ganache or a sauce at this point, so the more liquid you add, the thinner it will become.
Choosing Your Liquid: Water vs. Cream vs. Butter
Your choice of liquid impacts the final product:
- Hot Water: A neutral choice. It will dilute the chocolate flavor slightly and may reduce its gloss, but it's effective. Best for repurposing into baked goods or hot chocolate.
- Hot Cream: My preferred choice for ganaches or truffles. It adds richness, enhances flavor, and creates a luxurious texture. The fat in the cream also aids in emulsification.
- Melted Butter: Adds richness and can help restore a glossy sheen. Useful for sauces or glazes where a buttery flavor is welcome.
"The key to a successful hot liquid rescue is patience and vigorous, continuous stirring. Don't be afraid to put some muscle into it; you're actively re-emulsifying."
Method 2: The Cocoa Butter Emulsification (For Professional Finishes)
This method is a true professional secret, particularly valuable when you need to maintain the integrity of your chocolate for re-tempering or high-end applications like molding and enrobing. It's less about dissolving the sugar and more about providing additional fat to re-emulsify the chocolate without introducing water.
Understanding Cocoa Butter's Role
Cocoa butter is the fat component naturally present in chocolate. By adding pure, melted cocoa butter, you're not introducing water, which is the primary cause of seizing. Instead, you're increasing the fat content, which helps lubricate the sugar particles and allows them to disperse evenly within the fat phase, restoring the smooth texture.
Step-by-Step Cocoa Butter Rescue
- Melt Cocoa Butter: Gently melt a small amount of pure cocoa butter (about 1 tablespoon per 8-10 ounces of seized chocolate) in a separate clean, dry bowl or microwave-safe container. Ensure it's fully melted and warm, but not scorching hot.
- Incorporate Gradually: Add about a teaspoon of the melted cocoa butter to your seized chocolate.
- Stir Vigorously: Immediately and vigorously stir the chocolate. The added fat will begin to loosen the seized mass. Continue stirring forcefully, incorporating all the cocoa butter.
- Repeat Until Smooth: If the chocolate is still grainy or thick, add another teaspoon of melted cocoa butter and continue stirring. Repeat until your chocolate is smooth, fluid, and homogeneous.
- Consider Re-Tempering: If your goal is to re-temper the chocolate for molding or enrobing, this method is ideal. Once smooth, you can proceed with your chosen tempering method (tabling, seeding, or microwave) as usual.
Case Study: How Pâtisserie Delice Saved a Critical Batch
Case Study: How Pâtisserie Delice Saved a Critical Batch
I recall a frantic call from Chef Antoine at Pâtisserie Delice. A new apprentice had accidentally introduced steam into a 10-pound batch of high-quality dark couverture during tempering for an urgent order of bonbons. The chocolate had seized into a thick, gritty paste. With the order due in hours, discarding it wasn't an option. I advised Antoine to use the cocoa butter method. He carefully melted 100g of pure cocoa butter and, following my step-by-step guidance, slowly incorporated it into the seized chocolate while stirring vigorously. Within 15 minutes, the chocolate transformed back into a smooth, glossy liquid. He then successfully re-tempered it and completed the bonbon order, the quality indistinguishable from a batch that hadn't seized. This saved them hundreds of dollars in ingredients and, more importantly, their reputation for timely delivery.
| Liquid Type | Pros | Cons | Best For |
|---|---|---|---|
| Hot Water | Accessible, neutral flavor | Dilutes flavor, can make chocolate dull | Large batches, repurposing |
| Hot Cream | Rich texture, enhances flavor | Adds dairy, changes final product | Ganaches, truffles |
| Melted Butter | Adds richness, glossy finish | Adds dairy, can be greasy if too much | Sauces, glazes |
| Melted Cocoa Butter | Pure fat, maintains chocolate integrity, best for tempering | Specialized ingredient, can be expensive | High-end applications, re-tempering |
Method 3: The Immersion Blender/Food Processor Technique (For Stubborn Batches)
Sometimes, despite your best efforts with a spatula, a seized batch can be particularly stubborn, especially larger quantities. This is where mechanical assistance comes in handy. An immersion blender or food processor can provide the intense shear force needed to break down clumps and re-emulsify the chocolate quickly and efficiently.
When Manual Stirring Isn't Enough
I often turn to this method when dealing with a very large batch of seized chocolate or when the seizing is particularly severe and resistant to hand stirring. It's also excellent for ensuring a perfectly smooth texture, especially if you've added a fair amount of liquid and want to guarantee no residual graininess.
Step-by-Step Immersion Blender Technique
- Transfer Chocolate: Carefully transfer the seized chocolate into a tall, narrow container (for an immersion blender) or the bowl of a food processor.
- Add Hot Liquid/Cocoa Butter: Add your chosen hot liquid (water or cream) or melted cocoa butter to the seized chocolate. Start with the same ratios as Method 1 or 2.
- Blend Until Smooth: Using your immersion blender, begin blending on low speed, gradually increasing. If using a food processor, pulse and then run continuously. The high-speed blades will rapidly break down the clumps and force the sugar and fat back into a smooth emulsion. Keep blending until the chocolate is completely smooth and homogeneous.
- Scrape and Check: Periodically stop and scrape down the sides of the container to ensure all the chocolate is being processed. Check the consistency and add more liquid/cocoa butter if needed.
Important Considerations and Warnings
- Over-processing: While effective, be mindful not to over-process, especially with an immersion blender. Excessive blending can incorporate too much air, which might lead to a lighter, less dense chocolate, or even a slightly mousse-like texture.
- Temperature Control: The friction from blending can generate heat. Ensure your chocolate doesn't overheat. If it feels too warm, stop and let it cool slightly before continuing.
- Cleanliness: Always ensure your blender or food processor components are impeccably clean and dry before use.

Beyond Rescue: Preventing Seizing in Future Batches
While rescuing seized chocolate is a valuable skill, preventing it in the first place is always the preferred approach. As a veteran in this field, I can tell you that diligence and attention to detail are your best allies.
The Golden Rules of Chocolate Tempering
These principles are non-negotiable for consistent, flawless results:
- Impeccable Dryness: Every single utensil, bowl, and surface that will come into contact with your chocolate must be absolutely bone-dry. Even a microscopic water droplet is an enemy.
- Controlled Heat: Always melt chocolate gently, preferably over a double boiler with barely simmering water, or in short bursts in the microwave at low power. Avoid direct high heat.
- No Steam Contact: Ensure your bowl fits snugly over your double boiler, preventing any steam from escaping and condensing into your chocolate.
- Careful Additions: If adding flavorings, liqueurs, or colorings, ensure they are oil-based or, if water-based, warmed and incorporated very gradually into the chocolate, preferably at the very end of the melting process, and only if the final product doesn't require precise tempering.
For more in-depth information on the science behind chocolate, I often refer to resources like The Exploratorium's Science of Chocolate, which provides excellent foundational knowledge.
Investing in the Right Tools
Good tools make a significant difference in preventing issues:
- Quality Double Boiler: A well-fitting double boiler setup is essential for gentle, indirect heat.
- Accurate Thermometer: A digital thermometer is crucial for precise temperature control, especially during tempering.
- Silicone Spatulas: Easy to clean and ensure you scrape every bit of chocolate without introducing contaminants.
- Heatproof Bowls: Glass or stainless steel bowls are ideal for melting chocolate.
Repurposing Seized Chocolate: When All Else Fails
In the rare event that your chocolate is truly beyond rescue for its original purpose – perhaps it's been scorched, or you've added too much liquid for your intended application – don't throw it away! There are always creative ways to repurpose it, minimizing waste and still enjoying that delicious chocolate flavor.
Creative Uses for Unsalvageable Chocolate
I always advocate for a 'no-waste' kitchen. Here are some fantastic alternatives:
- Brownies or Chocolate Cake: Seized chocolate, especially after a hot liquid rescue, makes incredibly fudgy and moist brownies or rich chocolate cakes. The texture issues disappear in the baking process.
- Hot Chocolate: Blend it with hot milk or cream, a pinch of salt, and perhaps some sugar for a decadent homemade hot chocolate.
- Chocolate Bark: Spread the melted (even if slightly grainy) chocolate thinly on parchment paper, sprinkle with nuts, dried fruit, or sea salt, and let it set. Break into pieces for a rustic treat.
- Chocolate Sauce: If you've rescued it with cream or water, it's already a perfect sauce for ice cream, pancakes, or fruit.
- Chocolate Chips/Chunks: If it's too thick to spread, let it cool and solidify, then chop it into chunks to use as 'chocolate chips' in cookies or muffins.
Many chefs find creative ways to utilize ingredients that don't quite meet the mark for their primary use. For inspiration on incorporating chocolate into various desserts, a reliable resource like King Arthur Baking's chocolate recipes can be incredibly helpful.

Frequently Asked Questions (FAQ)
Question: Can I re-temper seized chocolate after rescuing it?
Answer: Yes, absolutely, but with a caveat. If you've rescued it using the cocoa butter emulsification method, it's highly likely you can successfully re-temper it for molding, enrobing, or dipping, as you haven't introduced water. However, if you used the hot liquid rescue method (with water, cream, or milk), the chocolate's composition has changed significantly. It will likely not temper correctly for a crisp, snappy finish and will not have a long shelf life for molded items. For these batches, it's best to use them in applications where tempering isn't critical, like ganaches or baked goods.
Question: Does the type of chocolate (dark, milk, white) affect how easily it seizes or can be rescued?
Answer: Yes, it does. White chocolate is generally the most susceptible to seizing because it contains no cocoa solids, only cocoa butter, sugar, and milk solids. Dark chocolate, with its higher cocoa solid content, is a bit more forgiving but still prone to seizing. Milk chocolate falls in between. The higher the sugar content (typical in milk and white chocolate), the more readily the sugar crystals will clump with water. However, all types can be rescued using the methods described, though white chocolate might require a bit more patience with the hot liquid method.
Question: What's the difference between seized chocolate and bloomed chocolate?
Answer: This is a common point of confusion. Seized chocolate is a textural issue caused by water, resulting in a grainy, thick, unworkable mass. It happens during melting or tempering. Bloomed chocolate, on the other hand, is a surface defect that occurs after the chocolate has set. It appears as dull gray streaks or white spots (fat bloom) or a powdery white coating (sugar bloom). Fat bloom is caused by improper tempering or storage at inconsistent temperatures, allowing cocoa butter crystals to rise to the surface. Sugar bloom is caused by condensation on the chocolate's surface, dissolving sugar which then recrystallizes as a white powder. Bloomed chocolate is still perfectly safe to eat, though its texture and appearance are compromised. It can often be re-melted and re-tempered to fix the bloom. For further reading on chocolate defects, consult resources like Fine Cooking's article on chocolate bloom.
Question: How much liquid should I add to rescue seized chocolate?
Answer: Start with a very small amount, typically 1 teaspoon to 1 tablespoon of hot liquid (or melted cocoa butter) for every 8-10 ounces of seized chocolate. The key is to add it gradually and stir vigorously after each addition. You'll observe the chocolate transforming. Stop adding liquid once it becomes smooth and reaches your desired consistency. Over-adding liquid can make your chocolate too thin or alter its flavor significantly. It's an iterative process that requires observation.
Question: Can I use seized chocolate for coating or dipping after rescuing it?
Answer: Generally, no, if you've used the hot liquid rescue method. The added water or cream will prevent the chocolate from setting with a crisp, snappy texture and a shiny finish required for proper coating and dipping. It will also shorten its shelf life. However, if you've successfully rescued it with melted cocoa butter and then re-tempered it, then yes, it can be used for coating and dipping, as its original fat-to-solid ratio has been largely maintained. Always test a small amount first to ensure it sets correctly.
Key Takeaways and Final Thoughts
Dealing with seized chocolate can be disheartening, but it doesn't have to be a disaster. As we've explored, understanding the 'why' behind seizing empowers you to confidently apply the 'how-to' for rescue. Here are the critical takeaways:
- Water is the Enemy: Even a tiny drop can cause seizing. Maintain a dry environment.
- Assess Before You Act: Distinguish between truly seized and merely thick chocolate.
- Three Powerful Methods:
- Hot Liquid Rescue: Best for ganaches, sauces, or baked goods (e.g., hot water, cream, butter).
- Cocoa Butter Emulsification: Ideal for maintaining chocolate integrity, especially if re-tempering is intended.
- Immersion Blender/Food Processor: A mechanical aid for stubborn or large batches.
- Prevention is Key: Practice meticulous dryness, controlled heat, and careful additions.
- Repurpose, Don't Waste: If all else fails, seized chocolate can find new life in many delicious applications.
Remember, every challenge in the kitchen is an opportunity to learn and refine your craft. Don't let a seized batch of chocolate defeat you. With these expert techniques in your arsenal, you're not just rescuing chocolate; you're mastering an essential pastry skill that builds confidence and reduces waste. Keep experimenting, keep learning, and your chocolate creations will only get better. For more advanced techniques and troubleshooting, I always recommend looking at professional culinary resources, such as those found through institutions like The Culinary Institute of America.
Recommended Reading
- Unexpected Textures in Modernist Cuisine? 7 Expert Fixes & Insights
- 7 Quick Ways to Master Culinary Terms for Business Meals
- Unlock the Secret: Why Do Your Cinnamon Rolls Get Hard When Cooled?
- Unlock Culinary Joy: 15+ Fun Oven-Free Cooking Activities for Kids!
- 7 Expert Strategies: Safeguarding Dessert Profits Amidst Fruit Price Spikes

0 Comentários: