 By
By 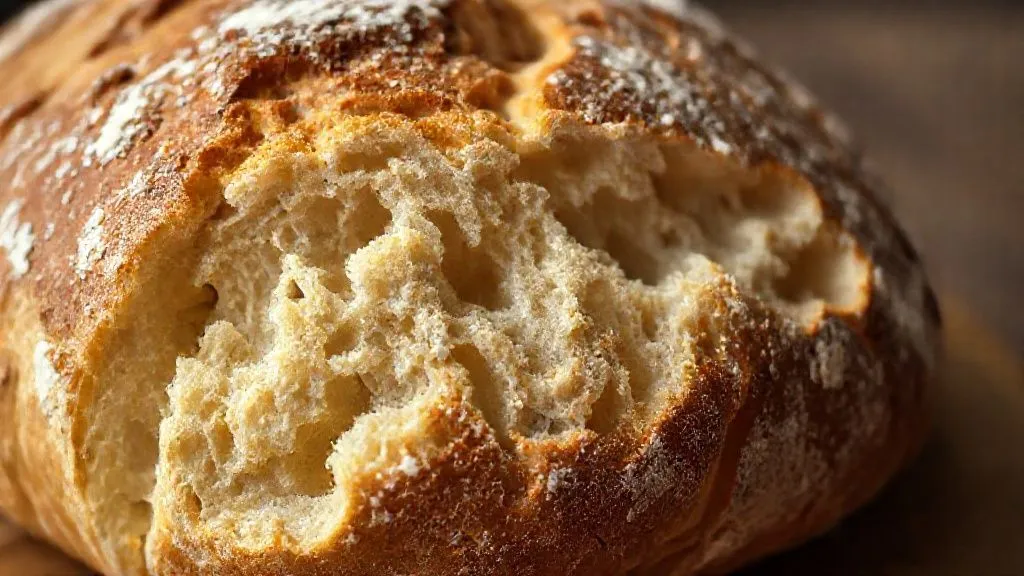
How to Consistently Achieve Open Crumb in High Hydration No-Knead Dough?
For over two decades in the world of artisan baking, I've witnessed the sheer joy and, let's be honest, the occasional profound frustration that comes with no-knead bread. It promised simplicity, but often delivered dense, disappointing results, especially when bakers ventured into the exciting realm of high hydration doughs.
The allure of a high hydration no-knead loaf is undeniable: a beautifully irregular, airy interior, a crisp, crackling crust, and that signature tangy flavor. However, many home bakers find themselves battling a sticky, unmanageable dough that refuses to develop the desired open crumb, leading to loaves that are more akin to a brick than a cloud.
In this definitive guide, I'll share my accumulated wisdom and the precise techniques I’ve refined over years to demystify the process. You'll learn not just what to do, but why it works, enabling you to consistently achieve that coveted open crumb in your high hydration no-knead doughs, transforming your baking from hit-or-miss to reliably extraordinary.
Understanding High Hydration Dough: More Than Just Water
Before we dive into techniques, let's establish what we mean by high hydration. Typically, this refers to doughs with a hydration level of 75% or more, meaning the water content is 75% or more of the flour's weight. Some truly ambitious bakers push this to 80%, 90%, or even higher, chasing that ethereal crumb.
The primary benefit of higher hydration is its direct correlation with a more open, irregular crumb structure. More water allows for greater expansion of gas pockets during fermentation and baking, leading to those beautiful, cavernous holes we all admire. It also contributes to a softer, more tender crumb and a crust that stays crisp longer.
However, this comes with significant challenges. High hydration doughs are notoriously sticky, slack, and difficult to handle. They require a different approach to gluten development and shaping compared to lower hydration doughs. It's a delicate balance, but one that, once mastered, yields truly superior results.

The Autolyse Advantage: Building Gluten Without the Knead
One of the most foundational steps for achieving an open crumb in no-knead bread, especially with high hydration, is the autolyse. This simple technique, popularized by French professor Raymond Calvel, involves mixing just the flour and water and letting it rest before adding salt or yeast.
During the autolyse, two critical processes occur: first, the flour fully hydrates, allowing the gluten-forming proteins (gliadin and glutenin) to begin bonding naturally. Second, enzymatic activity (proteases) starts to break down some of the protein, making the dough more extensible and easier to work with later. This pre-hydration and initial gluten development significantly reduces the need for mechanical kneading.
Steps for an Effective Autolyse:
- Measure Precisely: Accurately weigh your flour and water according to your recipe's hydration percentage.
- Combine Gently: In a large bowl, mix the flour and water until no dry spots remain. It doesn't need to be smooth; just ensure all flour is hydrated.
- Rest: Cover the bowl with a damp cloth or plastic wrap to prevent a skin from forming. Let it rest at room temperature for 30 minutes to an hour. For whole grain flours, I sometimes extend this to 2 hours to allow for more complete hydration.
- Avoid Salt: Crucially, do not add salt during the autolyse phase. Salt tightens gluten, inhibiting the extensibility we're trying to build at this stage.
"The autolyse isn't just a rest; it's an active period of enzymatic alchemy, patiently building the foundation for your dough's structure before you even think about yeast or salt."
Strategic Stretch and Folds: The Gentle Path to Structure
With high hydration no-knead doughs, vigorous kneading is out. Our primary method for developing gluten strength and elasticity is the stretch and fold technique. This gentle approach aligns the gluten strands, strengthens the dough, and incorporates air without degasing it excessively.
Stretch and folds are performed during the bulk fermentation (first rise). Unlike traditional kneading, which can tear delicate gluten networks in very wet doughs, stretch and folds coax the gluten into strength, building structure gradually and effectively. This is where you truly develop the elasticity required for an open crumb.
Developing Strength: The Right Technique
- Wet Hands: Always moisten your hands before touching high hydration dough. This prevents sticking and allows you to work cleanly.
- Four Sides: Gently grab a portion of the dough from the edge of the bowl, stretch it upwards without tearing, and fold it over onto itself towards the center. Rotate the bowl 90 degrees and repeat this process for all four 'sides' of the dough.
- Frequency: For most high hydration no-knead doughs, I recommend performing 3-4 sets of stretch and folds during the first 2-3 hours of bulk fermentation. Allow 30-45 minutes of rest between each set.
- Observe the Dough: Pay attention to how the dough feels. Early on, it will be very slack. With each set of folds, it should become noticeably stronger, more elastic, and hold its shape better. It will resist stretching more, indicating gluten development.
This systematic approach, as detailed by culinary science resources like Serious Eats on Gluten, is key to building a robust yet extensible gluten network.
Fermentation Mastery: Time, Temperature, and Observation
The bulk fermentation, or first rise, is arguably the most critical stage for achieving an open crumb in high hydration no-knead dough. This is where yeast produces gases that create the air pockets, and where the gluten network continues to develop and mature, ready to trap those gases.
Temperature plays a pivotal role. A cooler, longer fermentation (often overnight in a cool kitchen or refrigerator) allows for more complex flavor development and better gluten structure. Warmer temperatures accelerate fermentation, which can be useful but also risks over-proofing if not carefully monitored.
Observation is paramount. Forget strict timings; your dough will tell you when it's ready. Look for a significant increase in volume (typically 75-100% for an open crumb), a domed surface, and a jiggly, airy texture when you gently shake the bowl. You should also see small bubbles on the surface.
Case Study: From Flat to Fluffy with Fermentation Control
"Crumb & Crust Bakery," a small artisan shop, struggled with inconsistent open crumb in their popular high-hydration no-knead sourdough. Their head baker, Liam, was timing bulk fermentation strictly to 12 hours. However, his kitchen's ambient temperature fluctuated significantly with the seasons. By implementing a system of daily temperature checks and shifting to visual cues – specifically aiming for a 75% volume increase and a distinct 'jiggle' – instead of rigid timing, they transformed their output. Their loaves consistently achieved a beautiful, open crumb, reducing waste by 20% and boosting customer satisfaction, leading to a 15% increase in weekly sales within two months. This shift highlighted that dough readiness, not the clock, dictates quality.
| Dough Hydration | Ambient Temp (°F) | Bulk Ferment Time (Approx) | Visual Cues |
|---|---|---|---|
| 75% | 70-72 | 10-14 hours | Doubled, jiggly, domed, surface bubbles |
| 80% | 70-72 | 8-12 hours | Doubled, very jiggly, more bubbles, slight dome |
| 70% | 70-72 | 12-16 hours | 75% increased volume, soft, springy to touch |
Shaping High Hydration Dough: A Delicate Dance
Shaping high hydration dough can feel like wrestling an octopus, but it's a critical step for developing the surface tension that contributes to a great oven spring and an open crumb. The goal is to create a taut 'skin' on the outside of the dough without degassing it excessively.
Using minimal flour is essential. Too much flour will create dry spots that won't knit together, leading to a weak crust and potentially a tighter crumb. Think of flour as a tool, not a blanket. A light dusting on your work surface and hands is usually sufficient.
Techniques for a Taut Skin:
- Gentle Transfer: Scrape the dough gently from its bulk fermentation container onto a lightly floured surface using a dough scraper. Avoid tearing or deflating.
- Pre-Shaping: For very wet doughs, I often do a quick pre-shape. Gently fold the edges of the dough towards the center to form a loose round. Let it rest for 20-30 minutes, covered, to relax the gluten. This makes the final shape easier.
- Final Shaping (Bowl or Bench Scraper Method):
- Bowl Method: If using a banneton, you can often shape directly into it. Lift the dough with wet hands, gently stretch the top, and fold it under itself to create tension. Place it seam-side up in the banneton.
- Bench Scraper Method: On a lightly floured surface, use a bench scraper and the edge of your hand to gently pull and tuck the dough underneath itself, creating a tight ball. The goal is to build tension on the top surface.
- Minimal Handling: Work quickly and confidently. The less you handle the dough, the better. Overworking will degas it and compromise the crumb.
This mindful approach to shaping ensures that the delicate air pockets developed during fermentation are preserved, ready to expand during baking. For more detailed insights into shaping various doughs, refer to expert resources like King Arthur Baking's shaping guides.

Proofing Perfection: The Final Rise to Openness
After shaping, your dough enters its final proof (or 'retardation' if cold proofing). This is the last chance for the dough to develop its structure before hitting the oven. The goal is to optimize gas production and retention within the developed gluten network without over-proofing.
I almost exclusively recommend cold proofing for high hydration no-knead doughs. Placing the shaped dough in the refrigerator (38-40°F / 3-4°C) for 12-24 hours slows down fermentation significantly. This allows for deeper flavor development, strengthens the gluten further, and makes the sticky dough much easier to handle when transferring to a hot oven.
Using a banneton (proofing basket) dusted generously with rice flour is crucial. It supports the dough's shape during the slow proof and prevents sticking. If you don't have one, a bowl lined with a well-floured cloth will suffice.
"The 'poke test' is a classic, but for high hydration doughs, it's more nuanced. A dough that springs back too quickly is under-proofed, leading to a dense crumb. One that leaves a permanent indentation is over-proofed, risking collapse. Aim for a slow, partial rebound."
This slow, controlled final rise is essential for ensuring the dough has enough strength to hold its structure and expand beautifully in the oven, contributing directly to that open crumb.
Baking for Impact: Steam, Heat, and Timing
The moment of truth: baking. For an exceptional crust and an open crumb in high hydration no-knead bread, two factors are non-negotiable: high heat and steam. These elements work in concert to achieve maximum oven spring and a glorious crust.
A Dutch oven is my preferred tool for baking no-knead bread. It acts as a mini-oven, trapping the dough's own moisture to create steam in the initial baking phase. This steam keeps the crust supple, allowing the dough to expand rapidly (oven spring) before the crust sets. Without sufficient steam, the crust sets too quickly, restricting expansion and resulting in a denser crumb.
Step-by-Step Baking Process:
- Preheat Aggressively: Place your Dutch oven (with its lid) in your oven and preheat to a very high temperature, typically 475-500°F (245-260°C), for at least 30-60 minutes. This ensures the Dutch oven is scorching hot.
- Score and Transfer: Carefully remove the hot Dutch oven. Gently invert your cold-proofed dough into it. Using a sharp lame or razor, quickly score the top of the dough (a single long slash is common) to guide expansion.
- Steam Phase: Cover the Dutch oven and bake for 20-30 minutes. The trapped steam will work its magic, facilitating maximum oven spring.
- Crust Development: Remove the lid and continue baking for another 20-30 minutes, or until the crust is deeply golden brown and the internal temperature reaches 200-210°F (93-99°C). This phase dries out the crust, making it crisp.
- Cool Completely: This is crucial! Resist the urge to cut into your bread immediately. Transfer the loaf to a wire rack and let it cool completely for at least 2-3 hours. Slicing too early traps steam, leading to a gummy crumb.
The science behind this, as explored in culinary texts like Harold McGee's On Food and Cooking, confirms that proper heat transfer and steam management are paramount for the best texture.
Troubleshooting Common Open Crumb Failures
Even with the best intentions, things can go awry. Here's a quick guide to diagnosing and fixing common issues when trying to achieve an open crumb in high hydration no-knead dough:
| Problem | Possible Cause | Solution |
|---|---|---|
| Dense/Tight Crumb | Under-fermentation, weak gluten development, shaping too aggressively, under-proofed | Extend bulk ferment, more gentle S&F, lighter touch during shaping, longer final proof |
| Gummy Crumb | Under-baked, too much residual moisture, sliced too early | Bake longer until internal temp 200-210°F, cool completely on a rack |
| Large, Irregular Holes but Dense Surround | Uneven gluten development, inconsistent shaping, over-proofed | More consistent S&F, even shaping, adjust proofing time based on observation |
| Crust is Pale/Soft | Not enough baking time, oven temperature too low, Dutch oven not hot enough | Increase baking time, ensure oven and Dutch oven are fully preheated, consider a higher initial temp |
| Dough Sticks to Banneton | Insufficient flouring of banneton, dough too wet for its strength | Use more rice flour in banneton, ensure dough has enough strength before proofing, use a liner |
Remember, baking is a journey of continuous learning and adaptation. Each batch of flour, each change in ambient temperature, and even your own handling can influence the outcome. Pay attention to your dough, feel its texture, and learn to read its subtle cues. This observational skill, honed over time, is your greatest asset in achieving a consistently open crumb.
Frequently Asked Questions (FAQ)
Q: Can I use whole wheat flour in high hydration no-knead bread and still get an open crumb? A: Yes, absolutely, but it requires adjustments. Whole wheat flour has bran and germ which can cut gluten strands, making it harder to develop strength. I recommend using a slightly lower hydration (e.g., 75-80% for 100% whole wheat) and incorporating a longer autolyse (up to 2 hours) and more frequent, gentle stretch and folds to build strength. You might not get the same cavernous holes as with white flour, but a beautifully open, tender crumb is achievable.
Q: What's the ideal hydration percentage for a beginner aiming for open crumb? A: For beginners, I suggest starting with a hydration of around 70-75%. This is wet enough to encourage an open crumb but still manageable enough to practice handling and shaping techniques without too much frustration. Once you're comfortable, you can gradually increase it.
Q: How do I adjust fermentation times for different room temperatures? A: This is where observation trumps the clock. In warmer environments, fermentation will be faster, so your dough will reach its peak sooner. In cooler environments, it will be slower. If your kitchen is warm (above 75°F/24°C), reduce bulk fermentation time and monitor closely. If it's cold (below 65°F/18°C), extend the time or find a warmer spot for your dough. A good rule of thumb is to look for a 75-100% increase in volume during bulk fermentation, regardless of the clock.
Q: My dough is too sticky to handle, what am I doing wrong? A: Stickiness is normal for high hydration dough! The key is to work with wet hands, use a minimal amount of flour on your work surface (often just a light dusting of rice flour), and use a dough scraper as an extension of your hand. Don't fight the stickiness by adding too much flour; instead, learn to work with its inherent qualities. Practice makes perfect.
Q: Is a Dutch oven absolutely necessary for open crumb? A: While not strictly 'necessary' for all bread, for consistently achieving an excellent open crumb and a crisp crust in high hydration no-knead dough, a Dutch oven is highly recommended. It perfectly mimics a professional steam-injected oven at home. If you don't have one, you can try placing a pan of boiling water in the bottom of your oven during the initial baking phase, but results may vary.
Key Takeaways and Final Thoughts
- Embrace High Hydration: Understand its benefits for crumb structure and its unique handling requirements.
- Master Autolyse: This initial rest is crucial for gluten development without kneading.
- Gentle Stretch and Folds: Build strength and elasticity systematically, observing your dough's progress.
- Observe Fermentation: Let your dough's visual and tactile cues, not just the clock, guide your bulk fermentation.
- Delicate Shaping: Create surface tension with minimal flour and confident movements.
- Cold Proofing: Enhance flavor, strengthen gluten, and ease handling for sticky doughs.
- High Heat & Steam: Leverage a Dutch oven for optimal oven spring and a crackling crust.
- Patience is Key: Cool your bread completely before slicing to preserve its texture.
Achieving a consistently open crumb in high hydration no-knead dough is a journey of understanding, patience, and practice. It's about learning to read your dough, adapting to its needs, and trusting the process. By applying these expert techniques, you're not just baking bread; you're crafting an experience, one airy, flavorful slice at a time. Go forth, experiment, and enjoy the incredibly rewarding world of truly artisan no-knead bread!
Recommended Reading
- 7 Urgent Ways Restaurants Can Adapt Menus with Pantry Staples
- 7 Steps to Safely Scale Natural Preservation for Commercial Foods
- Unlock the Secret: How to Prevent Mold on Home Dehydrated Food
- Mastering the Perfect Sear: 7 Steps to Restaurant-Quality Crusts
- Vacuum Sealing Meat: The Ultimate Freezer Burn Prevention Guide


0 Comentários: